Enhanced Viewing Experience: A Step-by-Step Guide to Building Your Own Outdoor Projector Screen
Are you tired of squinting at a tiny screen while watching movies or sports events outdoors? Look no further! In this step-by-step guide, we will show you how to create your very own outdoor projector screen, giving you an enhanced viewing experience that will leave your friends and family in awe. Whether you’re hosting a backyard movie night, a game day gathering, or simply want to enjoy the great outdoors while watching your favorite shows, building your own outdoor projector screen is easier than you think.
We’ll walk you through the materials you’ll need, the measurements to take, and the construction process, ensuring that you end up with a professional-looking screen that delivers crisp and vibrant images. So, grab your tools and get ready to take your outdoor entertainment to the next level!
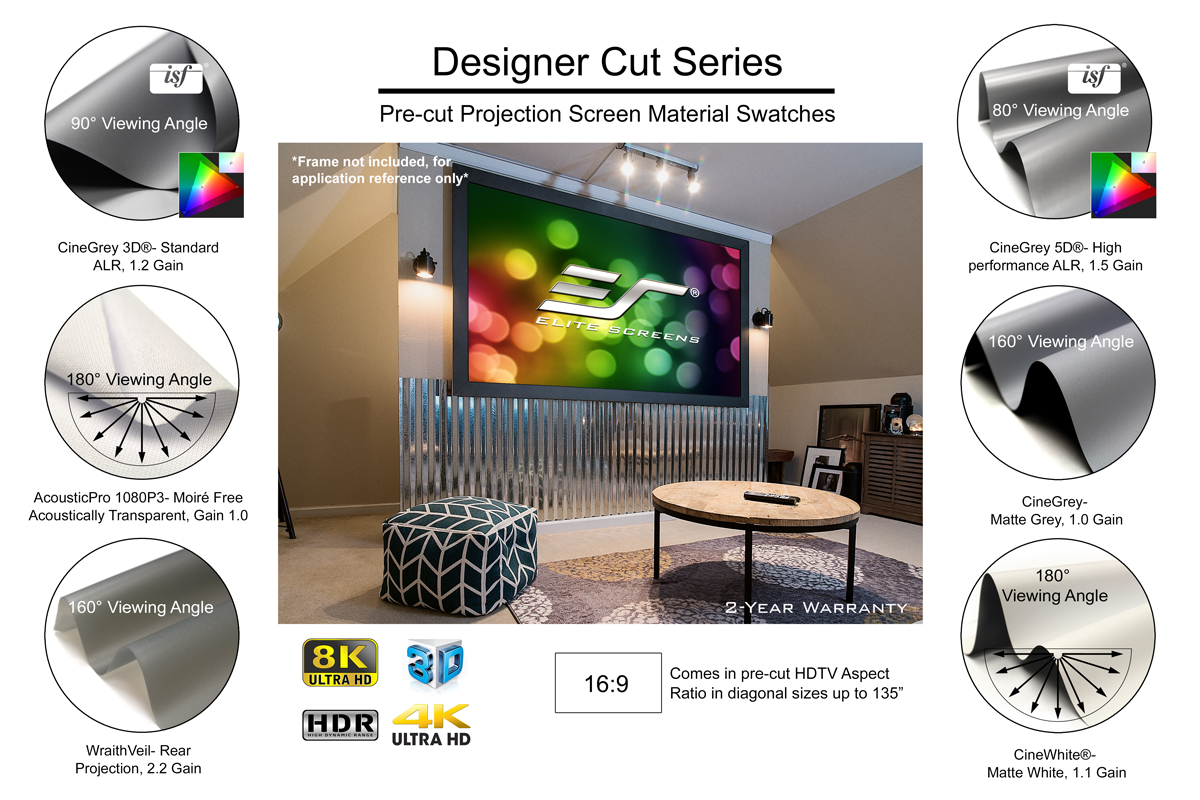
The Designer Cut Series is Elite Screens selection of pre-cut projection screen material swatches. The swatches are prepared for use in custom solutions and other improvised installations according to the integrator’s needs.
Understanding the basics of outdoor projector screens
Before you start building your own outdoor projector screen, it’s important to understand the basics. Outdoor projector screens come in various types and sizes, each with its own advantages and considerations. The two main types of outdoor projector screens are inflatable screens and fixed-frame screens. Inflatable screens are portable and easy to set up, making them popular for outdoor events. On the other hand, fixed-frame screens provide a more permanent solution and can be customized to fit your specific needs.
Consider factors such as screen size, aspect ratio, and gain to determine the best type of screen for your outdoor setup. By understanding the basics, you’ll be able to make informed decisions throughout the building process.
How to build your own outdoor projector screen
1. Choose the right location for your outdoor projector screen
The location of your outdoor projector screen plays a crucial role in the viewing experience. Ideally, you want a location that offers a wide and unobstructed viewing angle while minimizing ambient light. Look for a spot in your backyard or outdoor area that is flat and free from obstacles such as trees or buildings.
Consider the distance between the screen and the seating area to ensure optimal viewing. You may also want to think about the orientation of the screen, taking into account the sun’s position during different times of the day. You can create a comfortable and immersive outdoor movie-watching experience by carefully selecting the location.
2. Gather the necessary materials and tools
Before you can start building your outdoor projector screen, you’ll need to gather the necessary materials and tools. Here’s a list of what you’ll need:
- Projector screen material : Choose a high-quality screen material that is suitable for outdoor use. Look for options that are durable, weather-resistant, and provide excellent image quality.
- Frame materials : Depending on the type of outdoor projector screen you’re building, you’ll need materials such as PVC pipes, lumber, or aluminum frames. Make sure the materials are sturdy and can withstand outdoor conditions.
- Fasteners : You’ll need screws, bolts, or other fasteners to assemble the frame and attach the screen material.
- Measuring tools : A measuring tape or laser measure will come in handy for accurately measuring the dimensions of your outdoor projector screen.
- Cutting tools : Depending on your materials, you may need a saw or pipe cutter to cut the frame materials to size.
3. Build the frame for your outdoor projector screen
Now that you have all the necessary materials and tools, it’s time to start building the frame for your outdoor projector screen. The exact process will depend on the type of screen you’re building, but here are the general steps:
- Measure and cut the frame materials to the desired dimensions. Remember to account for any border or edge reinforcements.
- Assemble the frame using the appropriate fasteners. Make sure the frame is sturdy and square.
- If you’re building a fixed-frame screen, you may need to add additional supports or crossbars for added stability.
- Double-check the dimensions and alignment of the frame before moving on to the next step.
4. Attach the screen material to the frame
Once the frame is complete, it’s time to attach the screen material. Start by laying the screen material flat on the ground and aligning it with the frame. Secure the screen material to the frame using the appropriate fasteners, making sure it is taut and wrinkle-free. Take your time during this step to ensure a smooth and even surface. If you’re using a stretchable screen material, you may need to apply tension evenly across the entire surface. Trim any excess material if necessary. Remember, the quality of the screen material and the way it is attached will greatly impact the image quality and overall viewing experience.
5. Secure the outdoor projector screen
Now that your outdoor projector screen is taking shape, it’s important to secure it properly. Depending on the type of screen and the location, there are various methods you can use to ensure stability and prevent the screen from being affected by wind or other elements. Make sure to anchor inflatable screens securely to the ground using stakes or weights. Fixed-frame screens may require additional supports or braces to keep them steady. Consider using bungee cords or other flexible attachments to allow for slight movement without compromising the stability of the screen. Securing your outdoor projector screen allows you to enjoy worry-free outdoor entertainment even in less-than-ideal weather conditions.
6. Enhance the viewing experience with audio options
While a high-quality outdoor projector screen is essential for an enhanced viewing experience, don’t overlook the importance of audio. Depending on the size of your outdoor area and the number of viewers, you may need to invest in a separate outdoor sound system or portable speakers. Look for options that are weather-resistant and provide clear and balanced sound. Consider factors such as power output, connectivity options, and ease of setup. Additionally, you may want to explore wireless audio solutions to eliminate the need for long cables that can trip people up or become tangled. You can create a truly immersive outdoor entertainment setup by combining a great outdoor projector screen with high-quality audio.
Congratulations! You’ve successfully built your own outdoor projector screen, and now it’s time to enjoy the fruits of your labor. Gather your friends and family, grab some popcorn, and get ready to create unforgettable memories under the stars. With crisp and vibrant images, immersive sound, and the great outdoors as your backdrop, movie nights will never be the same again. Whether it’s a classic film, a thrilling sporting event, or a favorite TV show, your outdoor projector screen will provide an enhanced viewing experience that will keep everyone entertained. So sit back, relax, and let the magic of outdoor entertainment unfold before your eyes.
Conclusion
Building your own outdoor projector screen is a fun and rewarding project that doesn’t require advanced DIY skills. With the right materials, tools, and a little bit of patience, you can create a professional-looking screen that will impress your friends and family. So don’t wait any longer, start planning your next outdoor movie night and take your outdoor entertainment to the next level!